image tool
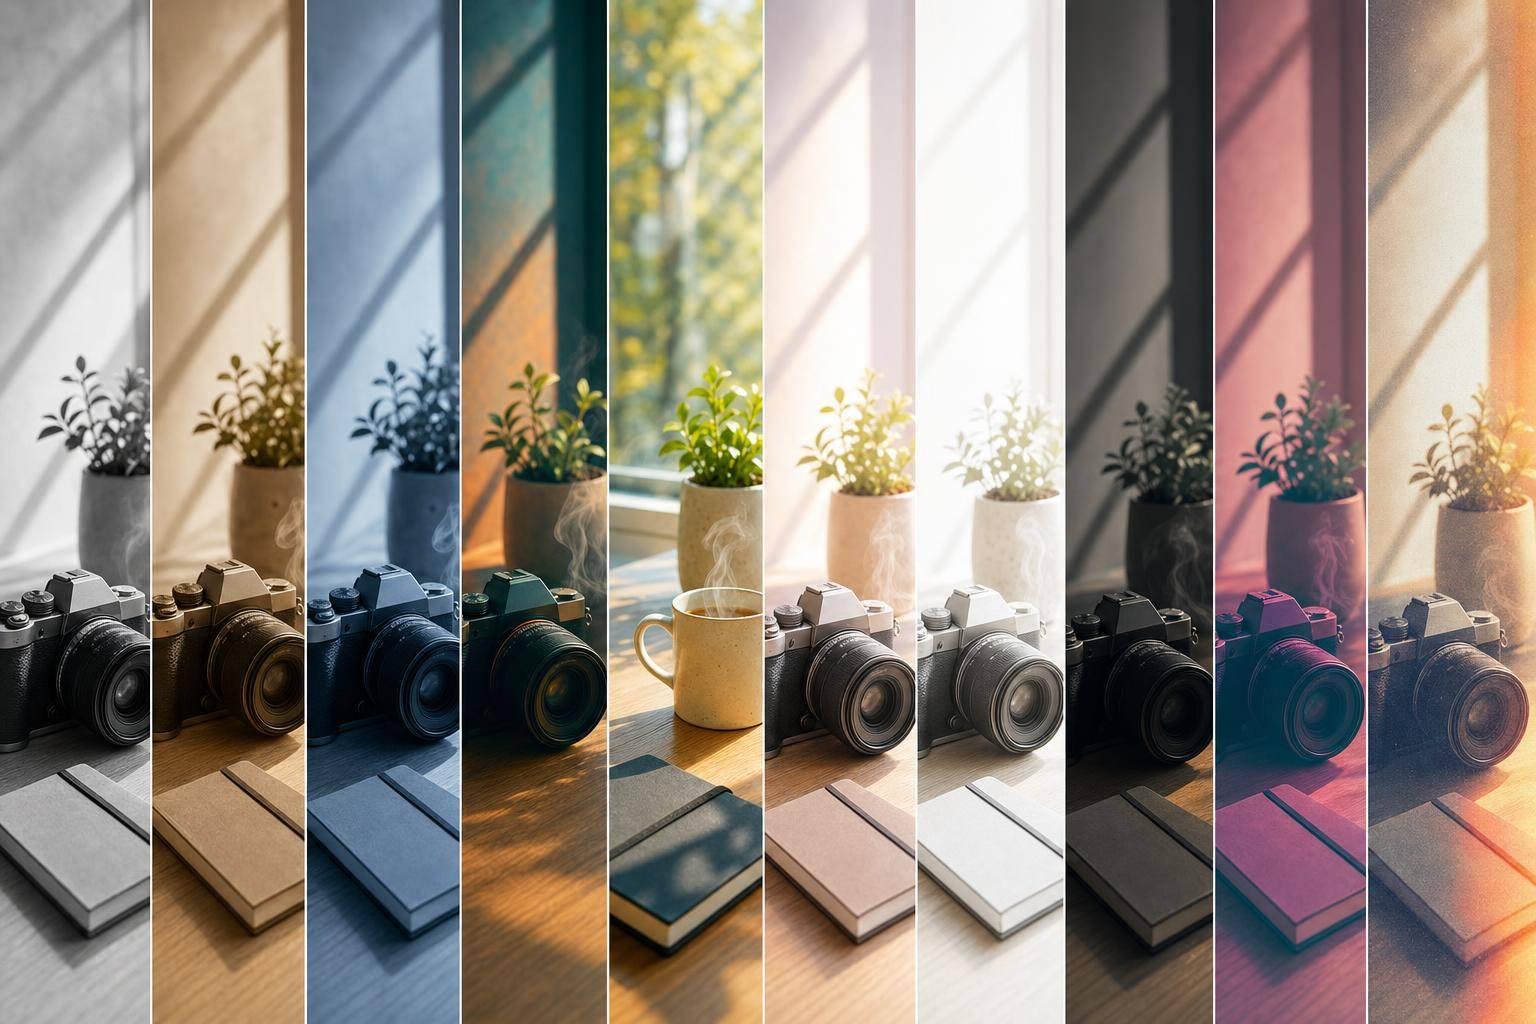

You can change the look of a photo in under 2 minutes, right in your browser, with $0 tools and no sign-up. This guide covers 10 popular effects: vintage, black and white, glitch, double exposure, blur and bokeh, cartoon, neon glow, duotone, vignette, and pixelation.
If I had to sum it up in one line: pick the effect based on the photo’s goal, not just the style.
For example:
A few simple facts matter here:
What I like about this set of effects is how each one fits a clear use case. Some keep detail high, like vignette and black and white. Others trade detail for style, like cartoon and pixelation. That makes the choice easier if you know what kind of image you’re editing.
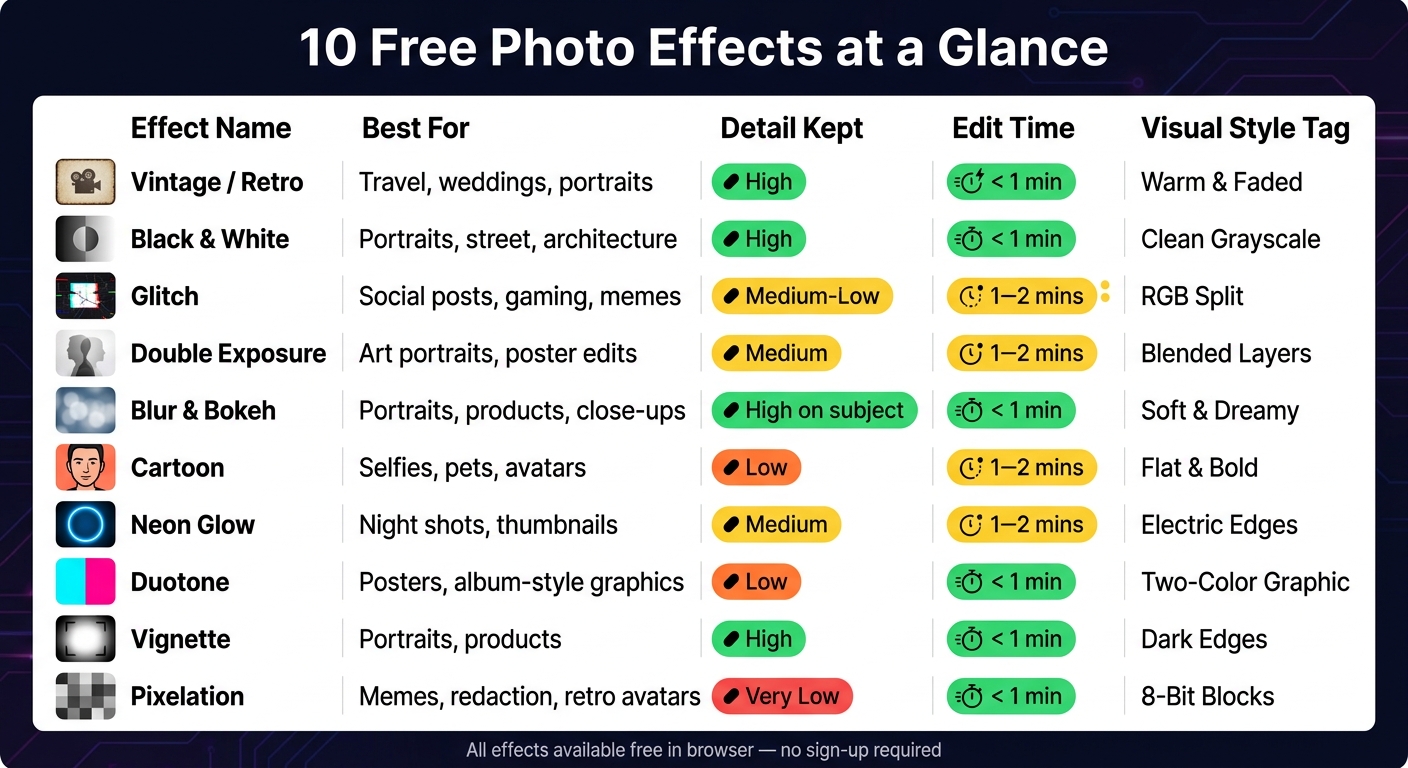
10 Free Photo Effects: Quick Comparison Guide
| Effect | Best For | Detail Kept | Usual Time | Main Look |
|---|---|---|---|---|
| Vintage / Retro | Travel, weddings, portraits | High | < 1 min | Warm, faded film look |
| Black and White | Portraits, street, architecture | High | < 1 min | Clean grayscale contrast |
| Glitch | Social posts, gaming, memes | Medium-Low | 1–2 mins | RGB split, screen-fail look |
| Double Exposure | Art portraits, poster edits | Medium | 1–2 mins | Two images blended together |
| Blur and Bokeh | Portraits, products, close-ups | High on subject | < 1 min | Soft background, dreamy lights |
| Cartoon | Selfies, pets, avatars | Low | 1–2 mins | Flat colors and bold outlines |
| Neon Glow | Night shots, thumbnails, profile pics | Medium | 1–2 mins | Bright edge glow |
| Duotone | Posters, album-style graphics | Low | < 1 min | Two-color graphic look |
| Vignette | Portraits, products | High | < 1 min | Darkened edges, bright center |
| Pixelation | Memes, redaction, retro avatars | Very Low | < 1 min | Large square blocks |
In short, this article is a fast guide to what each effect looks like, where it works best, and which free browser tool to use.
Browser-based editors keep things simple: upload, edit, download. That’s the usual flow.
Most tools let you drag in a file, pick a preset, and see the result right away. The preview updates as you make changes, so you can watch the final look take shape while you edit.
When you’re done, click download and the browser exports the edited image as a new file. Use PNG if you want cleaner image quality. Go with JPEG if you need a smaller file size. One catch: very large files can slow browser editing and make the whole process feel a bit sluggish.
Upload limits also vary by tool, and large images may need to be resized before you upload them.
With that workflow in mind, the next section breaks down the 10 effects and what each one does best.
Vintage gives photos a warm, faded film feel with grain and soft contrast. Retro pushes more toward 1980s to 2000s nostalgia, while sepia sits inside the vintage family with its brown-toned look.
This style tends to work best on portraits, weddings, travel shots, landscapes, and street scenes, especially when the photo was taken in natural light.
With ROCKIMG, you can use the preset and fine-tune the look with warmth, grain, vignette, and fade controls. It only takes a few seconds to get there.
ROCKIMG's Retro CCD-style filter creates a film look right in your browser with warmth, fade, grain, and vignette - no account needed.
If you want a cleaner, higher-contrast look, black and white comes next.
Black and white is more than just taking color out of a photo. A good edit shifts the image to grayscale, then adds contrast so it still has depth and detail. That’s what gives it a sharp, deliberate feel. If you use partial desaturation instead, the result looks softer and more faded.
B&W works especially well for street photography and portraits, where light, shadow, and texture do most of the work. It also fits feeds or photo sets that need a clean, unified look.
Most browser editors make this easy.
Set saturation to 0% or use a grayscale control, then tweak contrast and brightness. Those simple sliders are often all you need to get a clean monochrome image in seconds.
ROCKIMG's black and white conversion tool runs right in your browser, with no download or sign-up. You can also learn how to make glitch art for a more distorted aesthetic. If you want a more stylized digital look, the next effect is glitch.
Glitch makes a photo look like a corrupted screen right in the browser. You get RGB separation, tearing, scanlines, and digital noise. The result feels like a signal failure, not a soft blur.
High-contrast portraits usually look best with this effect. Neon scenes, gaming visuals, cyberpunk images, and older photos also match the style well. Older photos are a great fit when you want that VHS-style digital failure look. This effect works well for social posts, gaming thumbnails, profile pictures, and meme images.
| Control | What It Does |
|---|---|
| RGB Shift | Separates color channels |
| Scanlines | Adds CRT-style horizontal lines |
| Tearing / Slicer | Offsets image strips horizontally |
| Noise / Interference | Adds static and grain |
For a convincing broken-screen look, combine RGB shift with tearing and light scanlines. That mix usually gives the image enough chaos without making it hard to read.
ROCKIMG's glitch tool runs in your browser and doesn't need sign-up. If you want a fast way to test a few versions, use Randomize or Surprise Me.
If you want a layered effect instead of a digital break, double exposure is next.
Double exposure blends two photos into one surreal image. The most common setup uses a portrait silhouette with a landscape, cityscape, or texture placed inside it.
Start with a high-contrast portrait or a clean silhouette for the base. Then add one detailed image, like a forest, skyline, or star field.
Don’t pair two busy images. One image should hold the composition together, while the other fills it.
These are the main settings that shape the look.
| Control | What It Does |
|---|---|
| Blend Mode | Controls how the two layers mix, such as Screen, Multiply, or Overlay |
| Opacity Slider | Controls how visible the top layer is; 30%–60% is a good starting range |
| Background Remover | Isolates the subject so the second image fills only the silhouette |
| Brightness & Contrast | Fine-tunes each layer so overlapping details stay visible |
Screen is the go-to blend mode for a classic double exposure look. It lightens the image and lets the second photo show through inside the silhouette in a natural way. Multiply tends to work better if you want a darker, moodier result.
ROCKIMG's photo blending tool is a good place to start. Remove the background from the base image, place the second photo on top, then adjust the blend mode and opacity until both images merge cleanly.
If you want a softer, more atmospheric style, blur and bokeh is next.
Blur softens the background so the subject stands out. Bokeh adds out-of-focus light shapes that give the image a more cinematic, dreamy feel. It works best when you want the viewer’s eye to land on one clear subject instead of wandering across the whole frame.
This effect works especially well for:
| Control | What It Does |
|---|---|
| Blur Strength | Controls the overall amount of blur applied |
| Sharp Area Size | Sets how much of the image stays sharp |
| Bokeh Size | Adjusts the size of bokeh light shapes in highlights |
| Blur Type | Switches between Radial, Linear, Symmetric, or Gaussian blur |
ROCKIMG's blur tool softens backgrounds directly in your browser, with no registration required.
If blur softens a photo, cartoon goes the other way. It strips things down into clean outlines and flat blocks of color.
The cartoon effect gives a photo a hand-drawn, animated look with bold outlines, flat colors, and less fine detail.
Portraits, selfies, pets, cityscapes, and product shots usually work best, especially when the image has a clear subject and strong contrast.
Start with edge thickness. Then lower the color count and tweak smoothing to shape the final look.
| Control | What It Does |
|---|---|
| Edge Thickness | Defines how bold the outlines appear around subjects |
| Color Count | Reduces the palette to create flat, simplified color regions |
| Smoothing | Removes photographic noise for a more uniform, painted look |
Use ROCKIMG's cartoon-style effect to turn photos into simplified illustrations directly in the browser.
Next, neon glow pushes this same stylized direction into something brighter and more electric.
Neon glow adds a bright core with a soft halo around the edges, so parts of the image look like they’re lit from the inside. It’s a strong fit for night graphics, profile shots, and social posts, especially when you use bold colors like cyan, magenta, electric blue, and lime green.
This effect looks best on dark photos. Night scenes, city street shots, low-light portraits, silhouettes, and subjects with clean edges tend to work well. Bright daytime images usually don’t have enough contrast, so the glow can get lost.
Shiny details can help too. Reflections on wet pavement, glass, or other glossy surfaces can make the effect feel more lifelike.
| Control | What It Does |
|---|---|
| Glow Radius | Controls how far the glow spreads from the edge |
| Intensity | Sets how bright the neon effect appears |
| Thickness | Adjusts the width of the neon line |
| Background Dim | Darkens the image so the glow stands out |
| Offset X/Y | Shifts the neon layer to add depth |
ROCKIMG's neon glow tool creates this effect in your browser for free. Start with a dark photo, then increase the intensity before making the radius wider.
If you want bold color without a glow, duotone is next.
Duotone gives you bold color without the glow. It reduces an image to two tones, turning a photo into a two-color graphic. The darkest parts shift to one color, and the brightest parts shift to another, with a smooth gradient between them. The final look feels bold, flat, and poster-like.
This is different from a standard filter or tint. A normal tint lays one color over the whole image. Duotone uses two separate colors for shadows and highlights. That means you still keep the light and dark detail from the original photo, but the palette changes completely.
Portraits, album-cover-style images, and bold social posts tend to work best. Start with photos that have strong contrast so the two colors split cleanly. Skip images that rely on fine color detail, since duotone replaces the original palette from end to end.
One practical tip: avoid pairing two colors with similar brightness levels. If both colors sit in the mid-range, the image can look flat and muddy. A dark shadow color plus a light highlight color usually gives the sharpest, most graphic result.
| Control | What It Does |
|---|---|
| Shadow Color Picker | Sets the color applied to the darkest parts of the image |
| Highlight Color Picker | Sets the color applied to the brightest parts |
| Strength Slider | Controls how strongly the two-tone effect replaces the original colors |
| Tone Balance Slider | Adjusts how midtones are distributed between the two colors |
| Presets | One-click options for popular pairings like blue/coral or teal/orange |
Use ROCKIMG's duotone tool to set shadow and highlight colors right in the browser. Start with a high-contrast portrait or graphic image, then adjust the intensity until the tones separate cleanly.
If you want a darker frame instead of split color, move to vignette next.
A vignette darkens the edges and corners of a photo while keeping the center bright and clear.
Put simply: it creates a soft fade around the outside that draws the eye inward. That’s why it’s one of the easiest ways to guide focus without changing the entire image. A light vignette feels subtle. A heavy vignette feels more dramatic.
Portraits are the strongest fit. Darker edges push attention straight to the face.
Product shots can also work well with a subtle vignette. A strength setting between 30 and 50 keeps the focus on the item without making the effect too obvious.
For a softer retro look, pair a light vignette with low saturation and sepia. Keep the center broad and the feather high so the fade looks smooth and natural.
| Control | What It Does |
|---|---|
| Strength | Sets how dark the edge effect appears |
| Radius | Controls how far the darkening extends toward the center |
| Feather | Softens the blend between the clear center and darkened edges |
| Center | Moves the vignette center to focus on off-center subjects |
| Tint | Changes edge color from black to sepia, white, or a custom tone |
Use a free browser vignette tool with strength, radius, feather, and center controls for either a subtle portrait frame or a stronger spotlight look. If you want a harder, more digital look, pixelation comes next.
Pixelation turns a photo into large square blocks for a retro, low-resolution look.
You get hard-edged squares that make photos feel chunky, almost like an 8-bit or 16-bit game screenshot. That makes this effect a good fit for retro posts, avatars, memes, or redacted screenshots.
The block size changes the whole feel. A 4px block keeps most details in place. Push it to 50px or more, and the image starts to look much chunkier and more abstract.
Pixelation works well for portraits, avatars, screenshots, memes, and images with bold shapes or text you want to obscure.
Photos with bold shapes and bright colors tend to hold up better than highly detailed images. Fine textures and tiny details can get lost fast once the blocks get larger.
| Control | What It Does |
|---|---|
| Block Size | Adjusts the size of the square blocks and the level of abstraction |
| Color Depth | Limits colors for a more 8-bit or 16-bit look |
| Dithering | Adds speckling to mimic higher color depth |
| Outlines | Adds defined borders around shapes for a sprite-like look |
Use ROCKIMG's pixelation tool directly in your browser, with no registration required.
For the sharpest result, export as PNG instead of JPEG so the block edges stay crisp.
Next, compare the effects side by side.
Choosing a style gets a lot easier when you line up the mood, the kind of photo you have, and how much detail stays in the shot.
| Effect Category | Sub-Style | Mood | Best Photo Type | Detail Preserved | Edit Time |
|---|---|---|---|---|---|
| Vintage / Retro | Polaroid / Warm Film | Nostalgic, warm | Portraits, travel | High | Instant |
| Black & White | High-Key B&W | Dramatic, clean | Architecture, headshots | High | Instant |
| Glitch | Subtle / RGB Split | Edgy, modern | Urban, portraits | Medium-Low | Instant |
| Blur / Bokeh | Background Blur | Professional, soft | Busy backgrounds, portraits | High on the subject | Fast |
| Cartoon | Pencil Sketch | Artistic, playful | Portraits, pet photos | Low | 1–2 mins |
| Neon Glow | Cyberpunk | Vibrant, futuristic | Night shots, gaming | Medium | Fast |
| Duotone | Graphic Preset | Bold, graphic | High-contrast, posters | Low | Instant |
| Vignette | Soft Edge (20%) | Focused, moody | Centered subjects, products | High | Instant |
| Pixelation | 8-Bit / 15 px blocks | Retro, playful | Memes, privacy masking | Very Low | Instant |
Use this table to find the fastest effect for your photo, then jump to the tool list to choose the right editor.
Here’s the fast way to pick the right editor. Match the look you want to the ROCKIMG tool below, and you can get started in seconds.
| Effect | Recommended ROCKIMG Tool | Best Use | Typical Time |
|---|---|---|---|
| Vintage & Retro | ROCKIMG Vintage | Travel, weddings, events | < 1 min |
| Black & White | ROCKIMG Grayscale | Portraits, street photography, document scans | < 1 min |
| Glitch | ROCKIMG Glitch | Digital art and social posts | 1–2 mins |
| Double Exposure | ROCKIMG Overlay | Artistic compositions and creative portraits | 1–2 mins |
| Blur & Bokeh | ROCKIMG Blur | Portraits and product shots | < 1 min |
| Cartoon | ROCKIMG Cartoon | Profile pictures, fan art, social media posts | 1–2 mins |
| Neon Glow | ROCKIMG Neon | YouTube thumbnails and digital graphics | 1–2 mins |
| Duotone | ROCKIMG Duotone | Poster-style images and high-contrast shots | < 1 min |
| Vignette | ROCKIMG Vignette | Centered portrait subjects | < 1 min |
| Pixelation | ROCKIMG Pixelate | Privacy masking, face blurring, or retro game art | < 1 min |
Every tool listed above is free. There’s no sign-up and no watermark, which makes the whole process a lot easier.
Want to combine effects? Export your first edit, then upload that file again for the second pass. If your image is large, resize it first so things move more smoothly. For social posts, use JPG or WebP. For sharp edges, like logos and graphics, go with PNG.
Browser-based tools make photo edits fast. You can handle everything right in your browser and see changes in seconds.
The main thing is to match the effect to the photo's purpose. Go bold if you want attention. Keep it subtle if you want a clean touch-up. Try playful for memes or casual posts. Go polished for profile pictures and simple design work.
Once you choose the look, the process is easy: apply the effect, review the result, export the image, and upload it again if you want to stack another layer. Use the before/after toggle while you work. Your eyes get used to an edit fast, and that side-by-side check helps you keep the image balanced. If you're working with large files, resize them first so editing in the browser stays smooth.
These 10 effects cover the looks people use most for social posts, profile pictures, memes, and quick design jobs. Pick one and try it in ROCKIMG.
Start with the technical fixes: brightness, contrast, color, and size. That gives you a clean base before you move into style choices.
Once the image looks balanced, add effects like vintage, duotone, or glitch. Doing the cleanup first makes the final look hit harder.
Yes. Many free online editors let you combine multiple effects in a single edit by layering presets, manual adjustments, and slider changes.
For example, you might start with a duotone or vintage look, then add blur or a vignette. After that, you can fine-tune brightness, contrast, saturation, and hue to get the final style you want.
Choose PNG when image quality matters most, especially if you need crisp edges or transparency. PNG is a lossless format, so it keeps the image data intact instead of throwing parts of it away.
Choose JPEG when you want a smaller file size. A quality setting between 85 and 92 usually gives a solid balance between size and image clarity. If you're not sure which to pick, some tools export only PNG to avoid quality loss from re-compression.